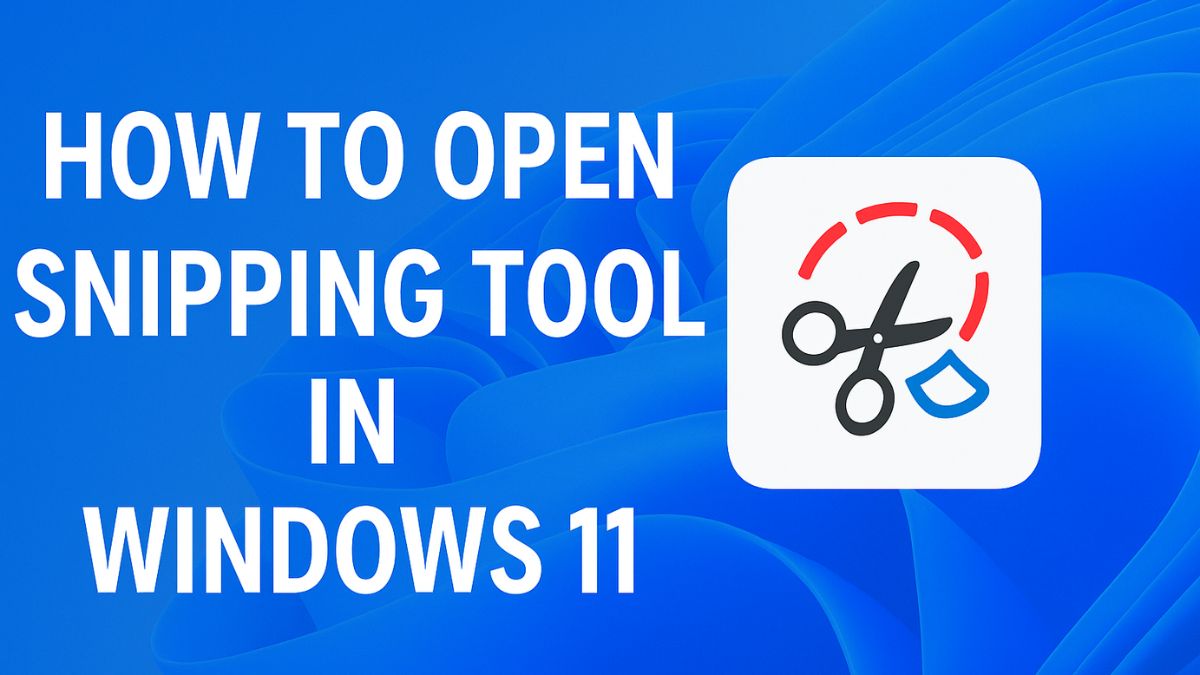
Snipping Tool is one of the most useful built-in applications in Windows 11, designed to help users capture screenshots, record screens, and annotate images quickly without needing third-party software. Whether you are creating tutorials, saving important information, reporting technical issues, or sharing visual content, Snipping Tool makes screen capture simple and efficient.
Windows 11 has improved Snipping Tool significantly by combining classic screenshot tools with modern editing and recording features. Many users, however, may not know all the available methods to open it. Fortunately, Microsoft provides several quick ways to launch Snipping Tool, including keyboard shortcuts, Start menu access, search options, and more.

This guide explains every major method to open Snipping Tool in Windows 11, along with troubleshooting tips and advanced usage advice.
What Is Snipping Tool in Windows 11?
Snipping Tool is Microsoft’s default screen capture utility that allows users to:
- Capture full-screen screenshots
- Take rectangular or freeform snips
- Capture specific windows
- Record screen activity
- Annotate captured images
- Save or share screenshots instantly
The updated Windows 11 version combines the older Snipping Tool and Snip & Sketch into one modern app.
Main Features of Snipping Tool:
- Screenshot capture
- Screen recording
- Delay timer
- Pen and highlighter tools
- Crop and edit options
- Clipboard integration
- Quick sharing
Why Use Snipping Tool?
Snipping Tool is useful for many purposes, including:
- Taking screenshots for work presentations
- Capturing online receipts
- Creating guides or tutorials
- Reporting bugs
- Saving social media posts
- Recording software issues
- Educational content creation
Because it is free and pre-installed, it is often the best choice for Windows users.
Easiest Method to Open Snipping Tool in Windows 11
One of the easiest and most reliable ways to open the Snipping Tool is through the Windows 11 Start menu search. Here’s how:
Step 1: Click the Start Menu and Type Snipping Tool
Click the Windows icon in the bottom-left corner of your screen or press the Windows key on your keyboard.

Begin typing Snipping Tool directly into the Start menu’s search field.
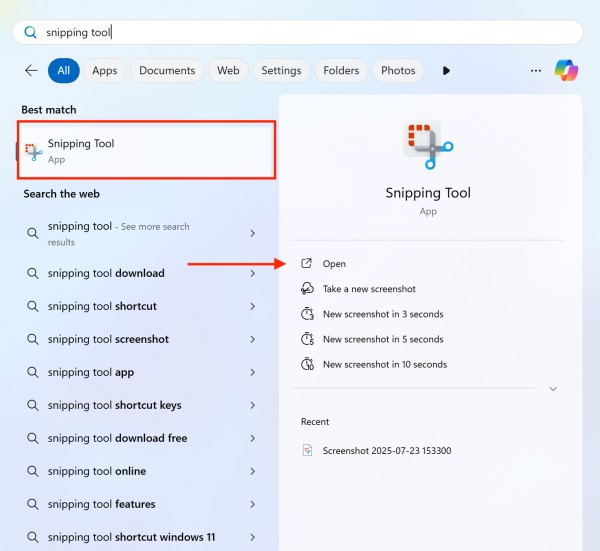
Step 2: Click on the Snipping Tool App
From the search results, locate and click on the Snipping Tool application.
Step 3: Launch the App and Start Snipping
Once the app opens, click the New button to start taking a screenshot.

Optional Step 4: Pin Snipping Tool for Quick Access
Right-click the app in the Start menu and select Pin to Start or Pin to taskbar to access it faster in the future.
Method 2: Use the Keyboard Shortcut (Windows + Shift + S)
If you want to quickly capture a screenshot without opening the full Snipping Tool window:
- Press Windows + Shift + S on your keyboard.
- Your screen will dim slightly, and a small toolbar will appear at the top.
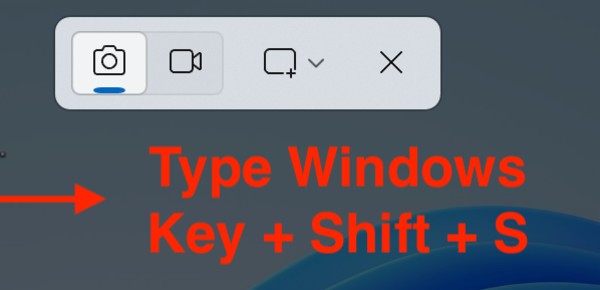
The screenshot is copied to your clipboard. You can open the Snipping Tool afterward to annotate or save it.
Method 3: Open Snipping Tool from the Run Dialog Box
For users who prefer using commands:
- Press Windows + R to open the Run dialog.
- Type
snippingtooland press Enter.
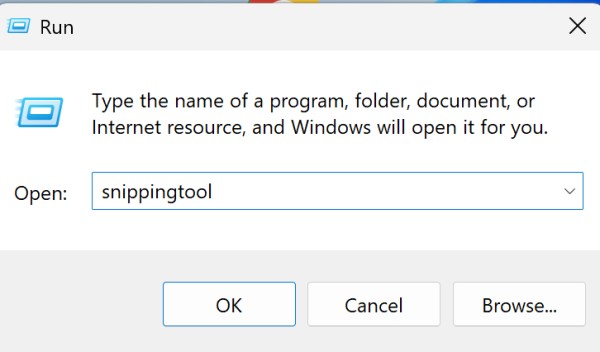
This will directly launch the Snipping Tool app.
Method 4: Access Snipping Tool via Windows Tools
You can also find Snipping Tool through Windows Tools, especially if you like navigating visually.
- Open the Start menu.
- Go to All Apps > scroll down to Windows Tools.
- Open Windows Tools.
- Locate and double-click Snipping Tool.
This method is particularly useful for those who prefer exploring apps manually.
Tips for Using Snipping Tool Efficiently in Windows 11
Use the Windows + Shift + S Shortcut for Quick Snips
Instead of opening the full Snipping Tool app, press Windows + Shift + S to instantly bring up the snipping toolbar and capture your screen. This is perfect for fast, on-the-go screenshots.
Pin Snipping Tool to Taskbar or Start Menu
For quick access, right-click the Snipping Tool icon in the Start menu and select Pin to taskbar or Pin to Start. This eliminates the need to search for it every time.
Use the Delay Feature for Timed Captures
Snipping Tool includes a delay timer (1 to 10 seconds), which is useful when you need to capture dropdown menus or tooltips. Click the down arrow next to the “New” button to select a delay.
Try Different Snip Modes
Experiment with all four capture modes to suit your needs:
- Rectangular Snip – Default box selection.
- Freeform Snip – Draw your own shape.
- Window Snip – Capture a specific app window.
- Fullscreen Snip – Capture the entire screen.
Enable Clipboard History for Multiple Snips
Turn on Clipboard History by going to Settings > System > Clipboard and enabling the feature. Press Windows + V to access a list of recently copied snips.
Use Annotation Tools After Snipping
After capturing a snip, use the built-in pen, highlighter, or eraser tools to annotate directly within the Snipping Tool. You can also crop, save, or share the image from the same window.
Use Snipping Tool to Record Screen (New Feature)
In the latest version of Windows 11, Snipping Tool allows screen recording. Open the app, click the record icon, select your screen area, and hit Start to begin recording.
Save Screenshots in Your Preferred Format
After editing, use File > Save As to save your snip in PNG, JPEG, or GIF formats depending on your needs. PNG is best for quality, JPEG for smaller size.
Use Ctrl + S Quickly to Save Your Snip
After taking a screenshot, press Ctrl + S to bring up the Save As dialog immediately. This speeds up your workflow and prevents losing unsaved snips.
Use Print Screen Button to Launch Snipping Tool (Optional)
You can set the Print Screen (PrtSc) key to open Snipping Tool.
Go to Settings > Accessibility > Keyboard and toggle on Use the Print screen button to open screen snipping.
Frequently Asked Questions (FAQs)
What’s the difference between Snipping Tool and Snip & Sketch?
In Windows 11, Snipping Tool and Snip & Sketch are merged. The new Snipping Tool has the interface of Snip & Sketch but includes Snipping Tool’s legacy features.
Where are my Snipping Tool screenshots saved?
By default, snips are copied to your clipboard. After snipping, you’ll see a popup at the bottom right. Click it to annotate or save manually. You can also press Ctrl + S after snipping to choose where to save the screenshot.
Can I change the default file format for snips?
No, Snipping Tool prompts you to choose the file format (PNG, JPEG, etc.) every time you save. There is no fixed default save format.
Is Snipping Tool available in all editions of Windows 11?
Yes. Snipping Tool is available by default in all editions, including Home, Pro, Education, and Enterprise.
Conclusion
The Snipping Tool is a hidden gem in Windows 11, providing a lightweight yet powerful way to take screenshots, annotate content, and even record videos. Whether you prefer using shortcuts, voice commands, or the classic Start menu, there’s a method suited for everyone to open and use this tool.
With its enhanced features like delay timer, multiple snip modes, and screen recording capabilities, it’s a reliable alternative to bulky third-party apps. By pinning it to your taskbar or creating a shortcut, you can ensure it’s always just one click away.
No matter if you’re a casual user, a student attending online classes, or a professional documenting software issues, learning how to open and use the Snipping Tool efficiently can boost your productivity and make your digital life easier. So go ahead, take that perfect screenshot in Windows 11—now you know exactly how.