Managing storage devices is an important part of maintaining a Windows 11 PC. Whether you want to create a new partition, format a drive, assign a drive letter, or extend an existing volume, Windows includes a built-in utility called Disk Management that makes these tasks easier. Unlike many third-party partition tools, Disk Management is available by default and provides a graphical interface for handling most common disk-related operations.
Many users only interact with storage through File Explorer, but Disk Management offers much deeper control over hard drives, SSDs, USB drives, and other storage devices connected to your computer. It can help you organize data, prepare a new drive for use, reclaim unallocated space, and troubleshoot storage issues without installing additional software.

In this guide, you’ll learn multiple ways to open Disk Management in Windows 11 and discover how to use its most important features. Whether you’re a beginner or an experienced user, understanding Disk Management can help you manage your storage devices more effectively and keep your system organized.
What Is Disk Management in Windows 11?
Disk Management is a built-in Windows utility that allows users to view and manage storage devices and partitions. It provides a graphical interface for performing disk-related tasks such as creating, deleting, formatting, shrinking, and extending partitions.
The utility works with various storage devices, including:
- Internal hard drives
- Solid-state drives (SSDs)
- External hard drives
- USB flash drives
- Memory cards
Disk Management can also display information about disk layouts, partition styles, file systems, and available storage space. Since it is included with Windows 11, there is no need to download or install anything before using it.
Why You Need Disk Management in Windows 11
Disk Management in Windows 11 is an essential utility that allows users to perform advanced storage-related tasks with precision and control. This tool is crucial for managing your computer’s internal and external drives, enabling you to create, delete, format, and resize partitions as needed. For instance, if you’re installing a new hard drive or SSD, Disk Management helps initialize the drive and assign it a usable format, allowing Windows to recognize and use it effectively. It also allows users to extend or shrink volumes without data loss, which is particularly useful when reallocating space across partitions.
Additionally, Disk Management provides the ability to assign or change drive letters, making it easier to organize storage devices for accessibility and clarity. If you’re running out of space on your main drive, this tool helps you manage and repurpose unused partitions efficiently. Advanced users may also use it to convert basic disks to dynamic, or from MBR to GPT, especially when setting up systems with larger capacity or configuring dual-boot setups. In essence, Disk Management serves as a centralized control panel for all disk-related operations, making it a vital feature for maintaining a stable, organized, and optimized computing environment in Windows 11.
Method 1: Open Disk Management Using the Start Menu
The Start Menu is the most straightforward way to access various features on Windows 11.
Steps:
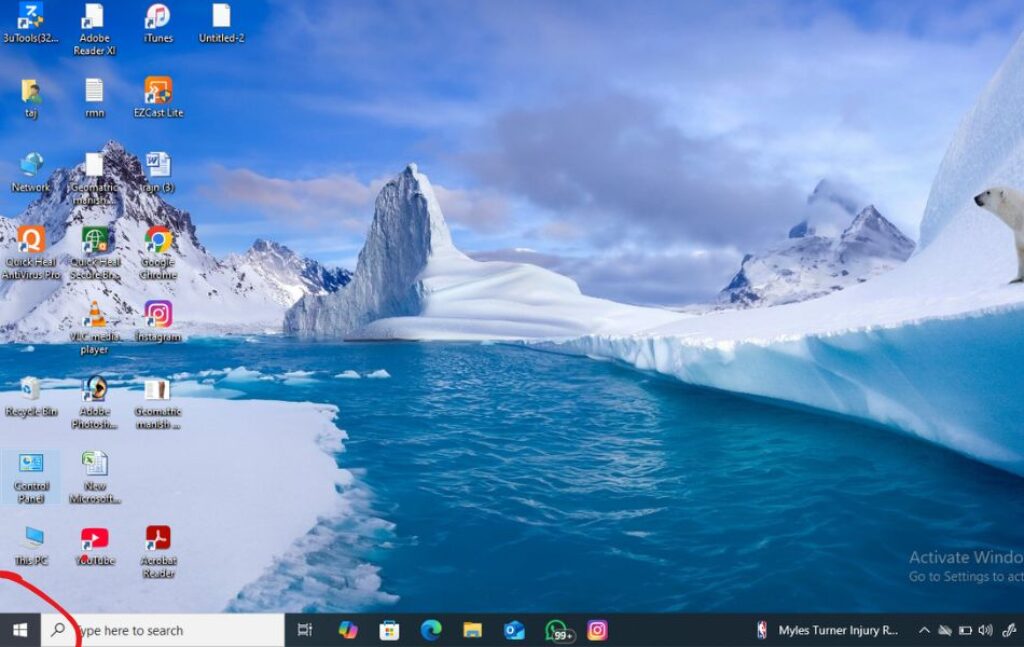
- Click the Start button (Windows icon) on the taskbar.
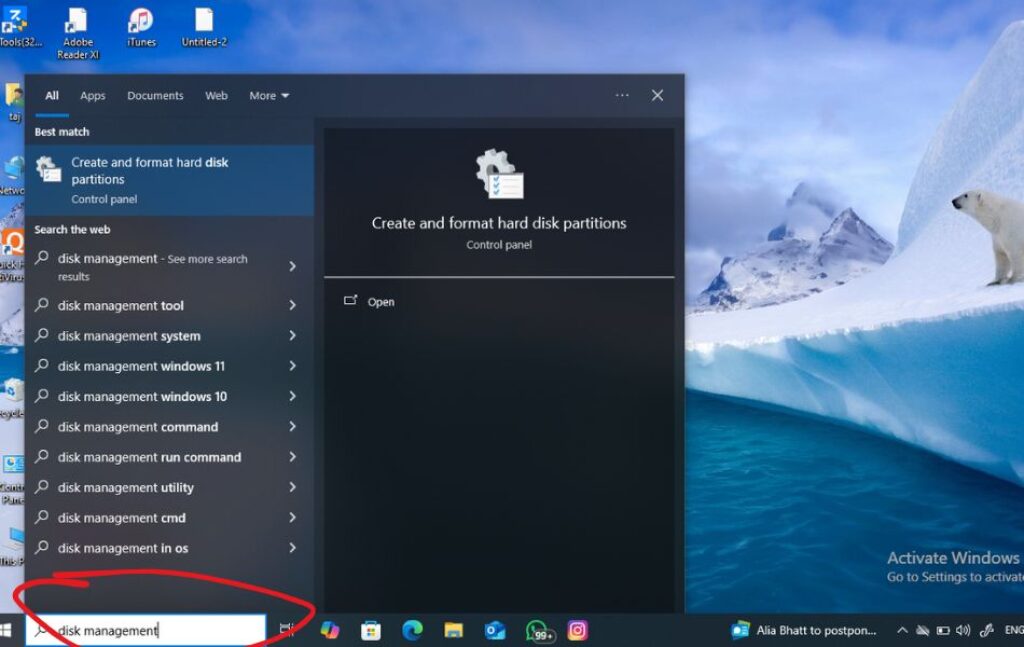
- Type Disk Management in the search box.
- From the search results, click on “Create and format hard disk partitions.”
Pro Tip: You can also right-click on the Start button and access it quicker. (More on this next.)

This method is simple and effective for beginners.
Method 2: Use the Win + X Menu (Quick Access Menu)
The Quick Access Menu in Windows 11 gives you fast access to administrative tools.
Steps:
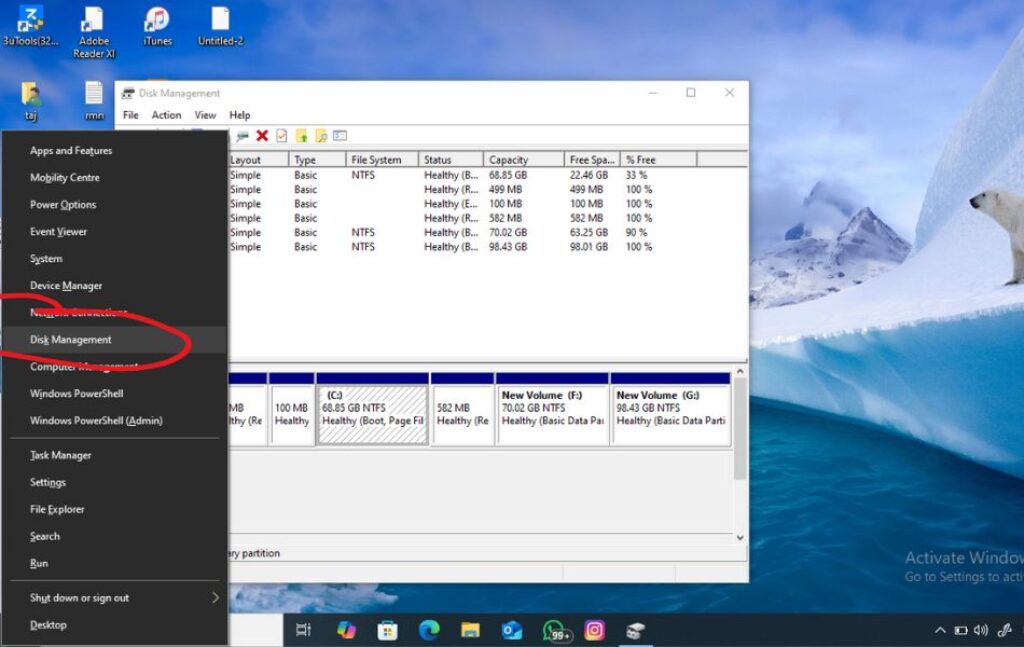
- Press Windows + X on your keyboard.
- Click Disk Management from the menu.
Note: This is one of the most popular and recommended ways because of its speed and reliability.
This method is ideal if you’re already familiar with keyboard shortcuts.
Method 3: Run Command Dialog (Using diskmgmt.msc)
Using the Run dialog is one of the fastest ways to launch Disk Management.
Steps:
- Press Windows + R to open the Run dialog.
- Type
diskmgmt.mscand press Enter or click OK.
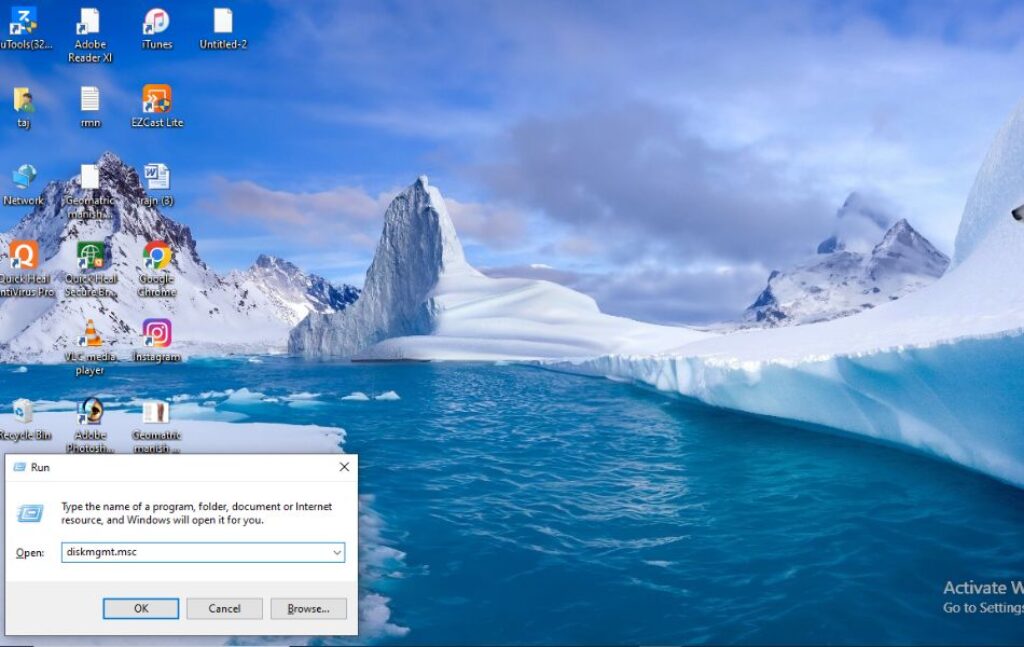
This opens Disk Management instantly. It’s a favorite among IT professionals and power users.
Method 4: Use Command Prompt (CMD)
You can also launch Disk Management via Command Prompt, which is handy if you’re already using CMD for other tasks.
Steps:
- Open the Start Menu, type Command Prompt, and click Run as administrator.
- Type
diskmgmt.mscand press Enter.
This launches the Disk Management utility directly.
Method 5: Open via PowerShell
PowerShell is a powerful command-line shell and scripting language included in Windows 11.
Steps:
- Click the Start button.
- Type PowerShell.
- Right-click Windows PowerShell and select Run as administrator.
- Type
diskmgmt.mscand press Enter.
This method is useful when you’re scripting or automating administrative tasks.
Method 6: Use the Control Panel (Indirect Access)
Though not the most direct method, you can still access Disk Management through Control Panel.
Steps:
- Open the Start Menu, search for Control Panel, and open it.
- Navigate to System and Security > Administrative Tools.
- Click Computer Management.
- In the left pane, click Disk Management under Storage.
While this takes more steps, it is useful when exploring other system tools.
Method 7: Use Computer Management Tool
Computer Management includes Disk Management along with other utilities like Event Viewer and Task Scheduler.
Steps:
- Press Windows + X and choose Computer Management.
- In the left pane, click on Disk Management under the Storage section.
This is a central hub for system management.
Method 8: Use Windows Terminal
The Windows Terminal can run both Command Prompt and PowerShell, making it another route to open Disk Management.
Steps:
- Press Windows + X and select Windows Terminal (Admin).
- Type
diskmgmt.mscand hit Enter.
This is useful if you’ve made Windows Terminal your default shell.
Method 9: Create a Desktop Shortcut
If you use Disk Management frequently, a desktop shortcut can save time.
Steps:
- Right-click on an empty area of your desktop.
- Choose New > Shortcut.
- In the location field, type:
diskmgmt.msc. - Click Next, give it a name like “Disk Management,” and click Finish.
Double-click the shortcut anytime to open Disk Management quickly.
Method 10: Use Task Manager
You can launch Disk Management through Task Manager as well.
Steps:
- Press Ctrl + Shift + Esc to open Task Manager.
- Click File > Run new task.
- Type
diskmgmt.mscand click OK.
It’s a handy option if you’re already managing tasks and need quick access.
Bonus: Pin Disk Management for Easier Access
Since Disk Management isn’t pinned by default, you can manually pin it for quicker access.
To Taskbar:
- Search for “Create and format hard disk partitions”.
- Right-click and select Pin to taskbar.
To Start:
- Search for it the same way.
- Right-click and select Pin to Start.
This reduces the number of clicks needed every time.
How to Use Disk Management in Windows 11
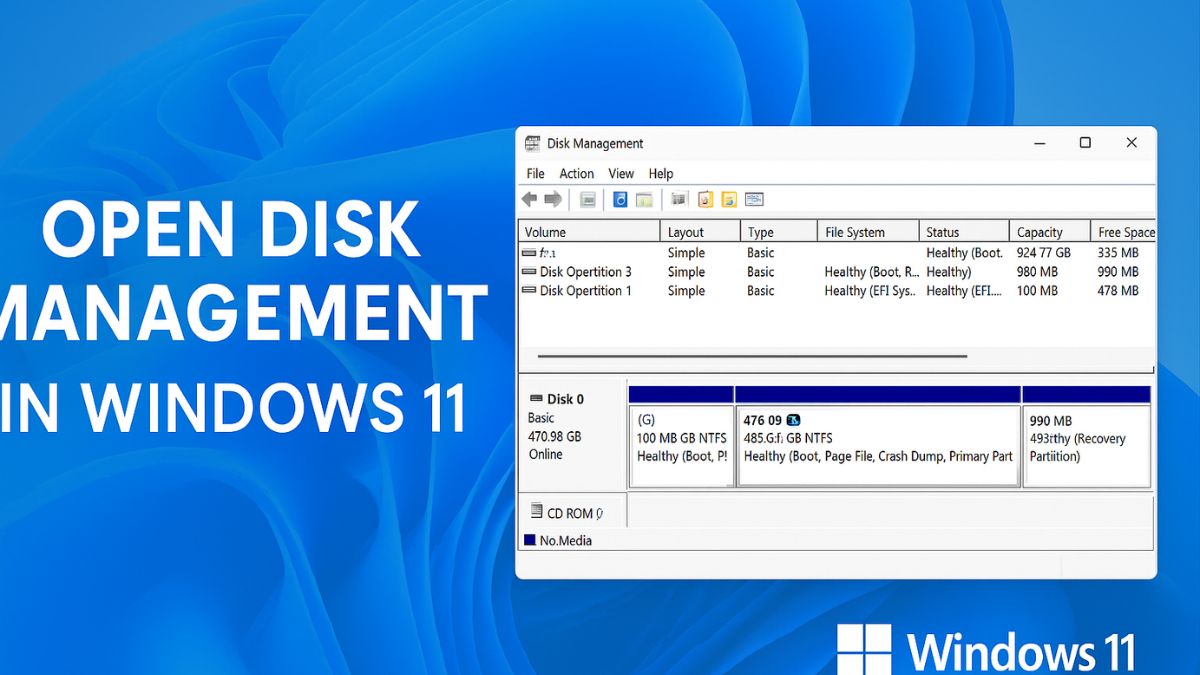
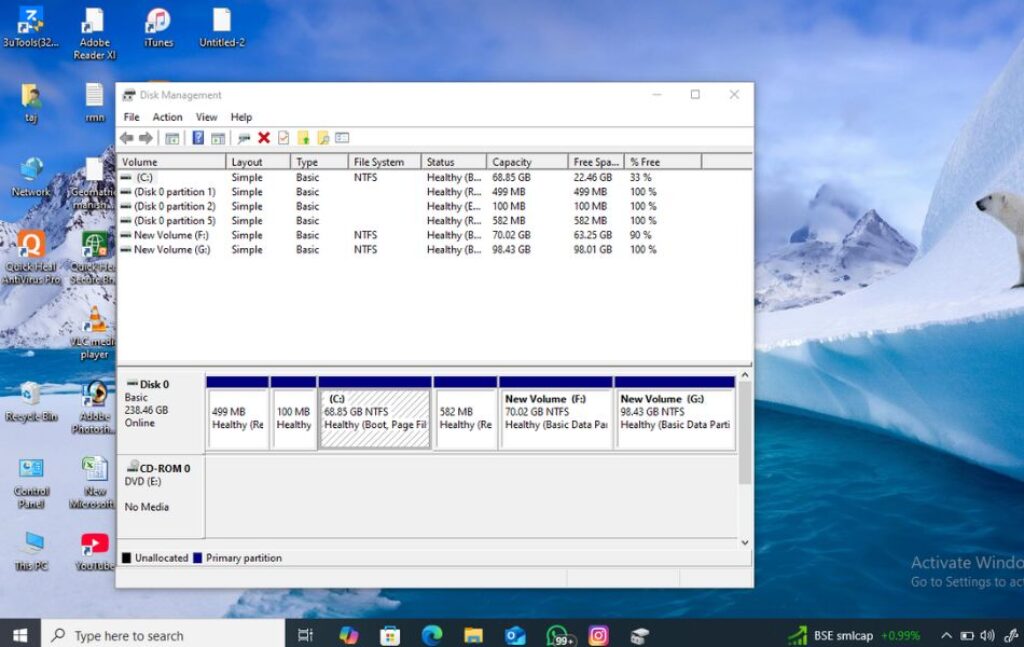
Once Disk Management is open, you’ll see information about all connected storage devices.
The upper section displays partitions and volumes in a list view. The lower section shows a graphical representation of each disk.
Before making changes, it’s important to understand what the displayed information means.
Understanding the Disk Management Interface
Each disk is labeled as Disk 0, Disk 1, Disk 2, and so on.
You may see information such as:
- Capacity
- File system
- Status
- Partition type
- Free space
- Drive letter
The graphical view helps you identify how storage space is divided among partitions.
Understanding this layout makes it easier to manage disks safely.
Create a New Partition
Creating a partition allows you to divide a drive into separate sections.
If you have unallocated space available, right-click the unallocated area and select New Simple Volume.
The New Simple Volume Wizard will appear.
Follow the wizard by specifying:
- Volume size
- Drive letter
- File system
- Volume label
Click Finish when prompted.
Windows will create the partition and make it available in File Explorer.
Creating separate partitions can help organize files and isolate data from the operating system.
Format a Drive
Formatting prepares a storage device for use and establishes a file system.
Right-click the partition you want to format and choose Format.
Select a file system such as:
- NTFS
- exFAT
- FAT32
Enter a volume label if desired.
Click OK to begin formatting.
Be aware that formatting removes existing data stored on the selected partition. Always back up important files before proceeding.
Change a Drive Letter
Windows assigns drive letters automatically, but you can modify them if necessary.
Right-click the desired partition and select Change Drive Letter and Paths.
Click Change.
Choose a new drive letter from the available options.
Select OK and confirm your choice.
The new drive letter will appear immediately in File Explorer.
Changing drive letters can help organize multiple drives and avoid conflicts with software or external devices.
Shrink a Volume
Shrinking a volume reduces its size and creates unallocated space.
Right-click the partition you want to shrink.
Select Shrink Volume.
Windows will analyze the partition and calculate available shrink space.
Enter the amount of space you want to remove.
Click Shrink.
The newly freed space will appear as unallocated storage.
This feature is commonly used when creating additional partitions on an existing drive.
Extend a Volume
Extending a volume increases its size by using adjacent unallocated space.
Right-click the partition you want to expand.
Choose Extend Volume.
The Extend Volume Wizard will open.
Select the available unallocated space.
Click Next and then Finish.
The partition will grow to include the selected space.
This feature is particularly useful when a drive begins running low on free space.
Delete a Partition
Deleting a partition removes it entirely and converts its space into unallocated storage.
Right-click the partition.
Choose Delete Volume.
Confirm the warning message.
Windows will remove the partition.
Since all data stored on the partition will be erased, ensure that you have backed up important files before proceeding.
Initialize a New Disk
When you install a new hard drive or SSD, Windows may require initialization before the disk can be used.
If a new disk appears as Not Initialized, right-click it and choose Initialize Disk.
You will typically see two options:
- MBR (Master Boot Record)
- GPT (GUID Partition Table)
For most modern systems, GPT is recommended.
After initialization, you can create partitions and begin using the drive.
Convert MBR to GPT
Some users need GPT to support larger drives or modern boot configurations.
Disk Management has limited conversion capabilities.
Typically, conversion requires deleting all existing partitions first.
After deleting partitions, right-click the disk and select the appropriate conversion option.
Because this process can erase data, a complete backup is strongly recommended beforehand.
View Disk Information
Disk Management provides detailed information about storage devices.
You can view:
- Partition size
- File system
- Free space
- Disk status
- Drive letters
To see additional details, right-click a partition and select Properties.
This information is useful when troubleshooting storage issues or planning upgrades.
Assign a Drive Letter to a New Drive
Sometimes a drive may not appear in File Explorer because it lacks a drive letter.
Open Disk Management and locate the affected partition.
Right-click it and select Change Drive Letter and Paths.
Choose Add.
Select an available drive letter and confirm the action.
The drive should immediately appear in File Explorer.
Common Disk Management Issues and Solutions
Although Disk Management is generally reliable, some users encounter occasional problems.
Disk Management Is Not Opening
If Disk Management refuses to open, restart your computer and try again.
You can also run:
sfc /scannowfrom an elevated Command Prompt to repair corrupted system files.
Ensuring Windows 11 is fully updated may also resolve the issue.
Drive Not Showing Up
If a storage device is missing, check whether it appears in Disk Management.
If it is detected but lacks a drive letter, assign one manually.
You should also verify physical cable connections and power connections for internal drives.
Extend Volume Option Is Greyed Out
This usually happens when unallocated space is not directly adjacent to the partition you want to extend.
Disk Management can only extend volumes into contiguous unallocated space.
In such situations, reorganizing partitions or using advanced partition software may be necessary.
Disk Displays as Offline
Right-click the disk and select Online if the option is available.
This can restore access to storage devices that Windows has marked as offline.
Access Denied Errors
Administrative permissions may be required for some operations.
Try launching Disk Management using an administrator account and attempt the action again.
Tips for Using Disk Management Safely
Disk Management is a powerful utility, and mistakes can result in data loss.
Follow these best practices:
- Back up important files before making changes.
- Verify the correct disk before deleting or formatting anything.
- Avoid interrupting disk operations.
- Use GPT for modern systems whenever possible.
- Double-check partition sizes before shrinking or extending volumes.
- Keep Windows updated to ensure compatibility and stability.
Taking a few extra precautions can prevent accidental data loss and save significant troubleshooting time later.
Conclusion
Disk Management is one of the most useful built-in tools available in Windows 11. It provides a centralized interface for managing storage devices, partitions, drive letters, and file systems without requiring third-party software. Whether you’re setting up a new SSD, creating additional partitions, extending a volume, or troubleshooting storage problems, Disk Management offers the tools needed to complete these tasks efficiently.
Windows 11 includes multiple ways to access Disk Management, allowing you to choose the method that best fits your workflow. Once familiar with the interface, you’ll find it much easier to organize storage, maintain healthy disks, and make better use of available space. By understanding the features covered in this guide and following safe disk management practices, you can confidently manage your computer’s storage and keep your system running smoothly.
FAQ
How do I open Disk Management in Windows 11 quickly?
The fastest method is pressing Windows + X and selecting Disk Management from the Power User menu.
Can I create a new partition without third-party software?
Yes. Disk Management allows you to create, delete, format, shrink, and extend partitions directly within Windows 11.
Is Disk Management safe to use?
Yes, but changes such as formatting or deleting partitions can permanently erase data. Always create backups before making major modifications.
What is the difference between MBR and GPT?
MBR is an older partition style with certain limitations, while GPT supports larger drives, more partitions, and modern UEFI-based systems. GPT is generally recommended for Windows 11 PCs.